Wednesday 28 December 2016

Sparkle Card

I didn't find enough leisure time this week to design a detailed card. So I made this very simple CAS card using the Fevicryl Acrylic Colours - Pearl metallic set. Designed this one to link to Simon's Sparkle Challenge. I have used rust, copper and silver colours for the background.

Didn't quite turn out the way I wanted, but here is the card.

 
 A closer look at the card.


Wednesday 21 December 2016

Gift box

It has been a bad week with 3 missed days of work and 5 agonizing days of flu. I just celebrated having successfully published a blog entry every week(Wednesday's, for no auspicious reason) for a quarter of year! It is an achievement for a person like me who would never manage to stick to any of my new ventures for sustained period of time. And Alas! I worried if I would miss this one as it's already Wednesday and I don't have anything as yet.

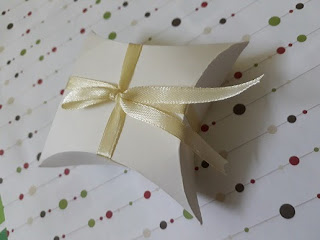
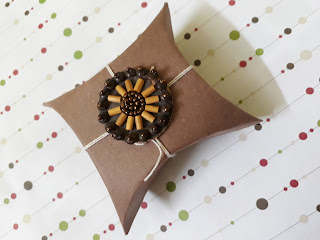
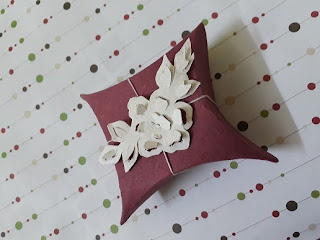
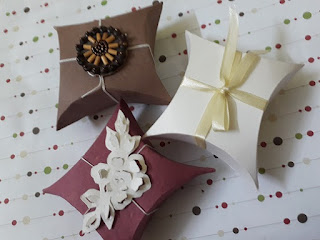
As I might have referred earlier, I follow the Simons for my weekly inspiration. So I just thought I would try to make some stuff to link to them. Their last(when I saw it was still current) week's challenge had been Gift it. Inspired by Virginia's cute little gift bag, I searched youtube for the most simplest gift box to make. This is simplest one I could find(going by the length of the video!). May be kid's stuff. Nonetheless this is possibly the only one within my capacity at my current energy level.

With several minutes of ransacking my cupboard for an old CD,frustrated I had to use a substitute(my Fruit n Nut tub lid). Then an never ending search for a scoring tool(can't use eraser on the kind of paper I used) and this is when I find all my age old pen's sweating it out for me(all of them at least left a mark). Finally manged these. Didn't look for perfection (seldom do though aspire), and just completed them.


You may wonder why did I attempt doing something for the last week's challenge. Because I am stupid person who can't get third grade arithmetic right (timezone conversion)!  At the end of the day just glad to have met my Wednesday deadline.

Wednesday 14 December 2016

Tiny Punch Flower Card

I recently got some punches and stamps to add to my craft arsenal. This is my first card using the tiny little punches of flower and leaves. The punches measured only 5/8". I typically cut out my card embellishments by hand but was quite happy to use the punches and get that crisp finish. I had cut out quite a few maroon and golden flowers and few dark green and light green leaves. But I was quite disappointed by the fact that the flowers and leaves were too tiny to be used in any real project.

I tried to assemble them in various patterns and contemplated using the pattern as a background for my main card. Finally, I hit upon a pattern that I liked. I just used the tiny flowers to create a wreath around my main sentiment of the card. My first card using my tiny little punches and clear stamps from Itsy Bitsy.


A closer look at the wreath made of tiny punched flowers.


Wednesday 7 December 2016

Dry Flower Art

As the saying goes "Necessity is the mother of all inventions", this creation of mine is a result of the dire need to cover up the cubicle walls in my new work location. I initially planned to just cover it up with some white sheets of paper. But I didn't like the idea of it looking so bland. I temporarily put it on hold for some time to think over what I should do about it.

Occasionally I go to office on weekends to have some peaceful 'me' time. During one such weekend, my eyes caught the lovely colorful flowers in the office campus when I was on my post lunch stroll and it struck me that I could make some dry flower art as I used to do during my school days. I collected a few flowers, leaves and twigs and dried them by compressing using a heavy hardbound book. I let them dry only for a couple of days as I wasn't patient enough. Here are my creations in the order they appear on my cubicle walls.


Actually, I am the gatekeeper to my floor sitting just next to the entrance.

Wednesday 30 November 2016

Wire Flower Nail Polish Bracelet

I have come across art and jewellery based on wire flowers and nail polish on various occasions. Recently, I stumbled upon this one on YouTube and found them stunningly beautiful. I am not into accessories and am not very fond of jewellery of any kind. But these were so pretty that I wished to make one for myself though not sure if I would ever use one.

Although the tutorial suggested use of glue followed by a coat of nail polish, I skipped the glue owing to the unavailability of the specified variant. However, am still happy with the results. Since I used some thin flower making wire strings for the bracelet base, I used a few beads to add some dimension to it. This being my first try at making jewellery, I didn't really attain a smooth finish. But, still love what I made!


Here is the side view of the finished jewellery. The jewellery in both the pictures is the same, the first one was taken in day light and the one below at night. I used pink, brown and golden color nail polish for the flowers.


Wednesday 23 November 2016

Christmas card

I lack discipline and haven't managed to persist in any of my earlier pursuits of my passion. My new passion for card making and blogging is also losing its momentum. I had initially planned to publish a blog entry every Wednesday which coincidentally also aligns with Simon's Wednesday challenge. Though I had many ideas for the Christmas card, I felt real lazy to do one. I finally ended up searching in the google images for inspiration for a real simple CAS card. Here is my inspiration and here is my card!.


I did love the way the card turned out to be. But I feel I should definitely work on my free hand drawing skills. I can't get my circles right and the graphite marks look real messy even after sketching with the black markers. I should have probably sketched the design lightly with the pencil.

Wednesday 16 November 2016

Thank you card

It's been a really long time that I touched my paint brushes and water colors. I tried using the snow flakes paper cut pattern (inspired from here) as stencil. But the pattern that got transferred with my coloring got really messy. So instead I used the cut pattern itself in my card. And this is how it turned out.


Though not very impressive, I decided to finish my card as I didn't wish to waste the snow flakes pattern that I cut out with so much difficulty. I made another small card with the left out colors that I had mixed.


This is a quick 2 minutes card with little or no effort. There is something about it that I liked that I decided to retain this one too.

Wednesday 9 November 2016

Sherlock Holmes Card

This is the most super cool fun/pun card that I have created so far. I am a great fan of Sherlock Holmes and love mystery novels as well as solving puzzles in general. I was at a loss for ideas when I saw the theme for this week's Simon's Challenge - Thinking of you. I drew inspiration from the lovely "Miss you" card from Tracy (Designer team) and decided to make one myself.

 
I wanted my card to be a cryptic one and it turned out as a collage card. I intended to camouflage the sentiment of the card "Missing you". Eventually, I ended up adding the "missing" word in the background in a not-so-subtle manner so that my message itself doesn't get missed :-).

Wednesday 2 November 2016

Swirl Flower Card

I should call myself a pseudo artist :-). The lack of right tools and raw materials often hamper me from doing my best.


The flowers are inspired from the DIY tutorial at bridalcookies.com. The rose colored sheets are from a magazine. I found them so pretty that I decided to use them in my card. I made this card for a friend of mine whose daughter's name is 'Kayal'. I wish I had some stencils or paper punches to cut out the letters. Hey, but that makes my cards genuinely handmade :-).

Wednesday 26 October 2016

Pink Pop Up Box Card

I have been hoping to make a pop up card for quite a while.  I did check out many wonderful tutorials on the  Internet. But I got so excited about the concept of paper mechanics that I wanted to design one on my own and the attempt failed miserably. So this time I decided to stick to an existing fool proof pop up design. I loved the popup box cards and chose to go with one of those.


I followed one of the pop up box card tutorials from youtube. The daisies are inspired from here. Chose pink color so that  I could link it to Simon's this week's challenge. I didn't wish to clutter my card so chose to leave out the leaves. Moreover, I wanted to maintain a dual tone to the card.
 

I hand cut the butterfly and loved the way it turned out. I didn't make this card for anyone in particular. So going by Oscar Wilde's quote "Falling in love with oneself is the beginning of a lifelong romance.", I decided to gift it to myself. I just added a sentiment that I liked. This is how the card looks when its closed.


Wednesday 19 October 2016

Corner Wall Sticker

I was on the lookout for ideas to brighten up my living room. I hunted for some wall stickers on the web and stumbled upon this one. Though I love asymmetry (more so because of my lack of perfection), I wasn't quite happy with the look of that particular one. So I decided to design one on my own. It turned out to be much prettier than I expected. It had a 3-D effect that the original wall sticker lacked.


I don't intend to share a detailed tutorial on how to make it. But I will briefly share the steps and the materials that you may need to design one.

Materials:
1. Card stocks
2. Origami color papers
3. Scissors/Craft knives
4. Wires
5. Stem tapes
6. Adhesives

Instructions:
1. Sketch out a template for small, medium and large sized leaves. Cut as many leaves as desired.
2. Choose a design for the frame that holds the leaves. Sketch out a template.
3. Stick the color papers on the card stocks before cutting them out using the templates.
4. Create desired length and number of stems using the wire and stem tapes.
5. Assemble the leaves on the stem and the stems on the frame, as desired.

Wednesday 12 October 2016

Inspirational Poster

It was one of those days... I needed something to lift my mood. One of my favorite pastime is to read inspirational and witty quotes. I loved this particular one that said "Destiny is not a matter of chance, it is a matter of choice", though am not very sure if I believe in it or not. Nonetheless I chose to make a poster quoting the same.


Getting back to the quote, I do believe that you can't be in control of everything in life but you can definitely control how you react to it. Well, knowing and walking the path are two different things!

Wednesday 5 October 2016

Bournville, that I earned


This card is one of my personal favorites amongst my creations. I made it out of a Bournville chocolate wrapper. I have a sweet tooth and prefer milk chocolates over dark ones. But on one occasion, my friend gave me a Bournville dark chocolate and sarcastically remarked, "You have earned it". Though I am usually quick to take offense, I didn't on this occasion (may be because there was some element of truth in it) and rather decided to make this lovely card out of the chocolate wrapper.


The dark brown and green color in the wrapper (raisin and nut flavor) made me think of a tree. The part of the wrapper where it gets glued together, gave a nice texture just apt for the tree trunk. I could find some reds and variant of green in the wrapper for my bird. I wanted to use the inner wrapper as well to make it look more authentic. I thought it would be a cool idea to import the barcode from the wrapper on to my card.


Wednesday 28 September 2016

Minion Card

I had been planning to make a card with minions. I eventually made this card for a friend of mine. Blue and yellow make a pretty cool combination.


I am not a great fan of stacked cards. But stacking is the easiest way to make a card look great. The sentiment tag can be moved around to make room for the baby's picture if desired. Linked it to Simon's Gift it.


Wednesday 21 September 2016

Monochrome card

My first blog article, inspired by my fellow bloggers who are as passionate about card making as I. I made this card for the Simon's CAS challenge.


I happened to come across the stack of tea cups in one of the magazines and loved them. So decided to design the card around it. Chose a sentiment that suited it. The monochrome color scheme is one of my favorites. And the card as a whole reflects my style. An apt choice for my first one (of course not my first ever, my first card that made into a blog entry) !